Thursday, September 3, 2015

Chocolate Chip Cookies {V}


I originally made these chocolate chip cookies for my dad. I wasn't intending on posting the recipe. I just felt like doing something nice. Buuuut they turned out amazing, and I got a few requests on IG to post the recipe. So, here it is!

Fair warning: These cookies are not like the recipe on the back of the Hershey's chocolate chip packet. Those cookes are oily, gooey, and thin. These cookies are puffy, moist, and wholesome (not in a bad way, I swear!). To be honest, as partial as I am to gooey cookies, I do prefer these over the Hershey's recipe. You can eat 6 of these (as I did) and still feel great. Although, I would like to experiment with more oily, vegan cookies in future just to get a bit more of the flattened gooey thing going on.

Chocolate Chip Cookies:
  • 2 1/4 cup spelt flour
  • 1/2 tsp baking soda
  • 1 tsp baking powder
  • 1/4 tsp salt
  • 2 flax eggs (5 tbs water mixed with 2 tbs flax)
  • 1 tsp vanilla extract
  • 1 cup coconut sugar
  • 1/4 cup extra virgin olive oil
  • 1-2 tbs almond milk (as needed)
  • 3/4 cup vegan chocolate chips or chopped vegan chocolate
Start off by prepping your flax eggs. Whisk the water and flaxseed together and leave in the fridge until it reaches an eggy consistency (mine always take a minimum of 15 minutes). Once your "eggs" are ready, pre-heat the oven to 190 C fan-forced and mix together the olive oil, vanilla and coconut sugar. After it forms a crumbly mix, add in the flax eggs and mix until combined. Whisk your dry ingredients together in a separate bowl and slowly add them to the wet mixture. Add 1-2 tbs of almond milk, depending on how dry your cookie dough is. I normally add 2 tbs. The dough will turn out quite sticky. This is okay! Now it's time to add the chocolate. If you've been using a mixer, you're probably going to need to use your hands at this stage to ensure that the chocolate gets fully mixed in. Place a sheet of baking paper and on a baking tray and lightly oil it. Form the cookie dough into balls (just so you know, this part will be pretty messy) and place on the tray. Bake for 10-15 minutes, until cookies are slightly brown and don't completely deflate when you press on the top of them. Wait for them to cool, and then enjoy them six at a time (you know you want to ;)).


Sunday, May 17, 2015

Type 1 Diabetes & The {Infamous} "Pill"

Alright, I know there's a lot of hate directed at the contraceptive pill, especially in the vegan/health movement, because it involves putting hormones into your body. Plus, a lot of versions of the pill contain lactose. So, it isn't exactly vegan friendly. Not to mention the increased risk of blood clots, and other undesirable side-effects such as weight gain.

That being said, as a type 1 diabetic, going on the pill has been one of the best decisions I have ever made for my health. As I became more conscientious of my blood glucose levels and gained better control of my levels through changing my diet, I realized that almost every week was different in terms of my blood sugar levels. One week, I'd have nearly perfect levels. The next, I'd constantly be low. The week after, I'd be high. The week of my period was the worst. The amount of insulin my body required would nearly double.

So, I came up with this hypothesis that taking the contraceptive pill might eliminate these fluctuations. Since the pill prevents you from getting pregnant by stablizing your hormones and hormones affect insulin requirements.

I went on the mini-pill and everything was hunky-dory. I stopped having the weekly changes in insulin requirements, and I didn't have any side effects. Since my blood sugar didn't randomly change, I was able to pretty much perfect my basal and bolus insulin. It seemed like I'd found the holy grail of diabetes management. For awhile...after a few months, I ended up with really bad spotting. So, I went off the pill. I didn't immediately go back to my GP and get a new prescription, because I wasn't so keen on the increased risk for blood clots and whatnot. I figured I'd just try going without it for awhile. I thought it might have been all in my head, and the pill wasn't making a difference.

Well, that wasn't the case. When I went off the pill, the glucose level fluctuations came back and they were even more noticeable than before. I don't think they were more severe, but I had gotten so used to the consistency. So, I was much more aware of the changes. It was so frustrating, going from having the best control I've ever had in my life to feeling completely powerless, constantly changing my basals. As soon as I figured out the right amount of insulin to take, my levels would change again.

So, I went back to my GP and got a prescription for the combination pill. I struggled a lot more when I first started taking the combination pill than when I took the mini-pill. When you google diabetes and the contraceptive pill, you'll find that diabetics will generally require more insulin when they're taking the pill. I didn't experience this when I was on the mini-pill, but I did have to significantly increase my insulin dosages when I went on the combination pill. It took awhile to figure out what the right levels were, but once I did, I was glad I stuck with it. Once again, the weekly fluctuations were eliminated, and I wasn't constantly trying to change basals. I also found that even though I significantly increased the amount of insulin I was taking, after a few weeks I was able to slowly start decreasing it until it was nearly back to what it was before I went on the combination pill.

This has nothing to do with sex. This has nothing to do with contraception. If I didn't have diabetes, I wouldn't take the pill for contraceptive reasons. I would, personally, just use condoms and chart my cycle. I don't look too favorably on the increased risk of blood clots and other side effects. But when it comes to type 1 diabetes, it's a bit of a dialectic. I can take the pill and have an increased risk of blood clots and put hormones into my body, or I can struggle to keep my glucose levels under control and be put at an increased risk for nerve damage, blindness, kidney failure, and constantly be nauseated/dizzy/eating junk food to bring up my blood sugar/repeatedly checking my blood sugar and changing insulin levels. Obviously, everyone's priorities, values, struggles with side effects from the pill, struggles with the effect of their cycle on their glucose levels is going to be different. But I wish that I had been exposed to stories/information about this sooner, rather than having to figure it out myself. So, I just wanted to put my experience out there in the hopes that if people with diabetes or other diseases share their stories and experiences, eventually there will be more information on different methods of management available.

Cashew Cheese {R, V, GF}

Cheese has always been my favorite food. Especially the cheese that comes on enchiladas. Oooofffttt. 

Therefore, it's only appropriate I make up a recipe for cashew cheese. While I never find faux-cheeses to be a real replacement. This is pretty dang delicious. It tastes very fancy and pretentious. I made this one up while I was trying out Raw Till 4, and was craving protein all day erryday. So, my body gave me a giant thank you card with glitter and a sound byte and everything for feeding it some of this. Plus, since it tasted very fancy schmancy, it worked really well with my figs and crackers. Which I was a bit suspicious of, to be honest. But now, I wish it was fig season again so I could get a massive tray of figs off the side of the road for fifteen bucks, and whip up this little snack.

Cashew Cheese:
  • 1 cup of cashews (soaked in water for at least an hour)
  • 1/4 cup + 2 tablespoons nutritional yeast
  • 1/2 tbs apple cider vinegar
  • 1/2 to 1 tablespoon Dijon mustard (start with 1/2 and add more to taste)
  • 1/4 cup water
  • 2 tablespoons lemon juice
  • 1/2 tsp salt
Simply blend all the ingredients together in your food processor until you're satisfied with the texture, and store in a jar in the fridge.


Almond Joys {R, V, GF}


In the interest of full disclosure: I hate Almond Joys. Every Halloween, I'd sort through my plastic pumpkin full of delicious goodies, and give all those nasty, super-sweet coconutty bars to my mother. 

So, I made these fully expecting to hate them. I received some insanely delicious salted almonds from Blue Diamond Growers, and I was having trouble coming up with ways to use them (aside from shoveling them into my mouth, ten almonds at a time, because yummmmmm). But those nasty candy bars popped into my head, and I thought they'd be fun to make and my mom might enjoy them. 


Little did I know that I'd be obsessed with them. OBSESSED. I could barely muster the strength not to eat them all and share them with my mom. They're the best raw treat I've ever created, and possibly the best raw treat I've ever had (those are big words, I know). So, without further ado...

Raw Vegan Almond Joys:
  • 3/4 cup coconut butter (roughly 3 1/2 cups shredded coconut blended in a food processor with 1 tbs coconut oil until it combines)
  • 1/4 cup cashew butter
  • 1/4 cup shredded coconut
  • 2 tablespoons coconut sugar
  • 3 tablespoons rice malt syrup
  • 24 Blue Diamond salted almonds
For the chocolate coating:
  • 1/4 cup cacao/cocoa powder
  • 2 tablespoons rice malt syrup
  • 1 tablespoon coconut oil
  • Hot water
Mix all of the ingredients together in a bowl and form into rectangles. If it is really wet (because coconuts are really oily) and doesn't want to stick together, squeeze it in your hand until some of the excess oil drips out. Press two almonds on top of each bar. Pop in the freezer to harden.

After the bars have hardened up, mix the cacao powder, rice malt syrup and oil together and slowly add hot water until it reaches your desired consistency. Dip each almond joy into the chocolate to coat it, and stick them back in the freezer for a few hours (until the chocolate coating firms up).

Lamingtons {V, GF}


These lamingtons were the biggest pain in the butt. Seriously. I made them three times. THREE TIMES. And why? Basically because I'm a doofus. I didn't realize I was using a gluten-free bread mix instead of gluten-free flour.

They kept turning out hard and rock-like. And I just couldn't understand why. Until I suddenly read the ingredients on the bread mix packet and noticed it had things like leavening and oil. DOH. 

So, then I re-made them with actual gluten-free flour (probably a smart move, aye?) and I was quite happy with them. They aren't super sweet, because that's how I like 'em. Maybe add a bit more coconut sugar if you like them suuuppaahhh sweet. Also, I tested the texture of these gluten-free ones against a gluten-ridden one, and really they're pretty similar. These ones are slightly different, but I actually liked these ones better. They're earthier...in a good way. ;)

Lamingtons
For the sponge cake: 2 chia eggs
1 and 1/3 cup Almond Breeze unsweetened vanilla almond milk
1 tbs white vinegar
2 cups gluten-free flour mix (I used Bob's Red Mill)
2 tsp baking powder
1 tsp baking soda (aka bi-carb soda)
1/4 cup coconut oil
3 tsp vanilla essence
1/2 cup coconut sugar

Mix 2 tbs chia seeds with 6 tbs water and let sit in the fridge for at least 15 minutes to make the chia eggs. Preheat oven to 180C fan-forced. Blend the chia eggs. Whisk the vinegar and almond milk together and set aside. Mix dry ingredients together. Mix coconut oil, vanilla essence and coconut sugar with the almond milk and vinegar. Slowly add the wet mixture to the dry mixture. Pour into an oiled and floured baking pan and bake for 18-25 minutes, until a knife comes out clean. Let cool. Remove from pan. Let cool completely before slicing.

For the chocolate coating: 3/4 cup cocoa/cacao powder
6 tbs coconut nectar
3 tbs coconut oil
apprx. 6 tbs hot water
Desiccated coconut

Mix cocoa powder, coconut nectar, and coconut oil together. Slowly add hot water until you reach your desired consistency. Dunk the sponge cake in the chocolate and sprinkle with desiccated coconut. Pop into the fridge for about an hour before enjoying. Continue to store in a sealed container in the fridge.

Sunday, March 1, 2015

Feeling Alone

It's been a long time since I have written about my illness on this blog. And I realized why just a few seconds ago, I only want to write about it if I have something somewhat helpful to say.

But maybe that isn't how I should look at this. Maybe I shouldn't feel like "I can only blog if I've conquered something. I can only blog if I have advice." Maybe I can share things that I can't deal with or don't know how to deal with. Maybe that could be helpful too. Because one thing I always feel is alone.

No one understands me. No one understands what I'm going through. No one is sick. No one cares. I'm just alone. 

Sometimes I desperately wish that I could read stories from people that are struggling. Sometimes success stories make me angry. Sometimes I wish there was just one person who hadn't gotten better, or recovered, or was happy. Sometimes I wish there was someone out there who feels miserable sometimes, who is struggling, who cries uncontrollably for no real reason.

Maybe there's someone else out there who feels like that too? And maybe, by some stroke of luck they might find this. And maybe, we can take comfort in knowing that we weren't quite as alone as we thought we were. Just maybe.

I feel like lately I've realized a lot of ways my illness has impacted me. When I was younger, I used to feel like I was fine.


All I have to do is take shots and prick my finger. That sucks and it's painful. But some people have to live in the hospital. I look fine. I look normal. My hair isn't falling out. I just need to take insulin and check my blood sugar. So, I'm fine...right?

People don't treat you like a sick person, because you don't look like a sick person. You aren't in the hospital every week. So, you must not be sick.

It's just like having a peanut allergy. Something is wrong with you. But something is wrong with almost everyone. We all have our cross to bear.

I think that shapes how you feel about yourself too. For example, I get really exhausted when I go out with people. It seems like other people can just go go go. They'll be out for eight hours and they'll still be laughing and running around. After about two or three hours, I'm basically done. Especially if my blood sugar goes high or low. I either feel unbearably sick and like I might fall asleep standing up. Or my heart starts racing, I get dizzy, and I feel the urge to start bawling like a baby. Only just now have I realized that it's probably related to my diabetes. When I was younger, I would just ignore being tired and try to act energetic. Because nobody understands that. So, you take insulin or eat some lollies and push through.

I remember one time I eating lunch with friends, and my blood sugar was over 400 mg/dl (four times higher than it should be). Plus, the smell of the food my friends were eating was making me feel even sicker. I felt horrible, nauseated, tired, and anxious (Because there's always that fear when your blood sugar is high. What if it doesn't come down? What if I've developed insulin resistance? What if I go into DKA?).

So, I just sat there with my head on the table, trying to remain calm. The next day, my friends asked me "Why were you angry yesterday?" I tried to explain that my blood sugar was high. So, I felt really sick and the smell of the food they were eating was making me even more nauseated. In the back of my mind, I knew no one would understand. They might say "Sorry." They might believe me that I wasn't angry, but they wouldn't give it another minute's thought. They'd go about their business and maybe feel a bit relieved knowing I wasn't mad at them. But one of my friends said, "If that happens again, you know I'll just go and sit somewhere else with you?" Even now, that is one of the most understanding and caring things someone (aside from my family) has ever said to me or offered to do for me.

Recently, I had to go to an appointment with my endocrinologist and since she works at a diabetic clinic, I was able to get my feet and eyes checked at the same time (because as a diabetic, I'm at risk for diabetic neuropathy (nerve damage) and diabetic retinopathy (swelling of blood vessels in the eyes that can result in blindness)).

So, I spent three hours in the clinic. Getting my blood tested. Being weighed. Being measured. Talking about my medical history. Getting my blood results back. Getting the readings off my pump back. Trying to come up with a way to regulate my brittle blood sugar levels. Having my feet prodded. Having my feet touched. Having eye drops put in my eyes. Slowly not being able to see. Having bright lights shone in my eyes. Trying not to blink. Waiting. Waiting. Hearing results.

The whole thing was traumatic. Especially the eye test. I joked in the waiting room to my mom, "At least I get a free trial of what it's like to go blind." Except I didn't even go blind. I could still see. But I couldn't read a single word on my phone or in a magazine. It was terrifying. I don't really know why it was so terrifying. Maybe because I was relating it to going blind in the future? Maybe because it's just scary having one of our senses taken away? I don't really know.

Then, I had lights shone in my eyes and I had to look up and down and all around, trying not to blink. It couldn't have taken more than fifteen minutes, but it felt like an eternity. Waiting. That's something that really strikes me about being sick. There's a lot of doing. Taking shots, going to appointments, pricking your fingers. But there's also a lot of waiting. Sometimes it almost feels like the doing is just to distract you from the waiting.

Once I left, I just started crying uncontrollably. Nothing really bad even happened. My a1c was 6.9, practically perfect. Nothing was wrong with my feet. Nothing was wrong with my eyes. My blood sugars had gotten a bit worse, and that was scaring me a lot. Even though my a1c was still good (not as good at the last time I got it checked), my blood sugars are brittle. I go high and I go low and it just bounces up and down and up and down all day long. So, yeah. That wasn't so good.

Since I was crying like my dog had just died, my car broke down, and I spilled my ice cream on the pavement. Someone asked me "Did you get bad news?" And I couldn't really say I did. I mean, I did. My blood sugars and a1c were worse, but it wasn't life threatening. The a1c was still good. The blood sugars weren't good, but in the end, the a1c level is what you're really concerned about.

Later I started thinking about it. When you're sick, you get bad news every day. You wake up in the morning and test your blood sugar and it's high. You're still sick. You eat something and feel nauseated. You're still sick. You have a low and get dizzy and are forced to eat something you don't want to eat. You're still sick. You have to schedule a doctor's appointment. You're still sick. You have to be poked and prodded and you have to wait and wait and wait. You're still sick. And hey, one day, you'll be even sicker.

I wish that I could end this saying that I've found a group of perfect friends who are empathetic and understand me, or are patient with me. But I haven't. My friend offering to sit with me while I felt sick still makes my eyes well up.

And I wish that I could say that I've figured out how to deal with people not understanding. That I don't need people to understand, because I understand. And I have enough understanding for everyone. But I don't. I get angry and lonely and I cry uncontrollably.

And I wish that I could end this on an uplifting note and say that it's okay. It's okay that I don't have a perfect group of friends, and it's okay that I get angry and lonely. But it isn't. It's a reality of life. I think it's a reality of everyone's life, regardless of whether you're sick or not, but it isn't okay. And I desperately wish that one day, everyone will magically understand and care for each other. But that probably won't happen. We're only human. So, I guess the most uplifting thing I can say is that, while we might each be suffering alone, I don't believe that we are alone in our suffering.

Friday, January 23, 2015

Vegan & Gluten-Free Pizza


I've never been a massive pizza fan, as far as I can remember. However, my little brother has been eating pizza non-stop, and I started to feel pretty left out. I tried a bit of his awhile ago, and felt extremely sick. Clearly, Pizza Hut or Dominos wasn't an option. 


Ultimately, I decided to try making my own. I'm pretty terrible at thinking up fun and healthy lunch ideas. So, I'm really thrilled that I ended up trying this. Not to mention, it tasted awesome. I actually liked it better than the Pizza Hut pizza. Their crust is all weird and sugary....like why? Plus, I didn't feel ill afterwards! #bonus


Vegan & Gluten-Free Pizza

Toppings of choice (I used onion, spinach, broccoli & pomegranate seeds)
Pasta/pizza sauce

For the crust:
2/3 cup gluten-free flour mix
1/3 cup buckwheat flour
1/2 teaspoon baking soda (bi-carb soda)
1/2 tablespoon baking powder
1/4 teaspoon salt
2 tablespoons vegan butter substitute (e.g Nuttelex)
1/2 cup unsweetened Almond Breeze almond milk

Method:

Preheat the oven to 180 fan forced. Mix dry ingredients, add butter and mix again. Add Almond Breeze slowly, until the dough just sticks together. Knead the dough on a floured surface 8 times. Then roll the dough out until it's about 1/4 inch thick. Bake for 10 minutes.

In the mean-time, prepare toppings (eg. sauté spinach and onion, boil broccoli, de-seed pomegranate). After ten minutes, spread a few spoonfuls of pasta sauce onto the pizza and add toppings. Bake for another 3-5 minutes, and enjoy!

Thursday, January 8, 2015

PB & Acai Nice Cream Slice


Oh hai little abandoned blog, how've you been? Good? Not so good? I see. Well, even though the treats on here are healthier than their traditional counter-parts, it's still not good to eat them all the time. So, I've been trying to cool down on making like a billion healthier goodies, and just trying to eat in a healthy, balanced manner. As a result, I haven't been around.


Buuuut today was a special occasion! I got an eye exam and there were no signs of diabetic retinopathy (a complication of diabetes that results in swelling of the blood vessels in the retina, or in the final stage, the development of new blood vessels. anyway, it can result in blindness and it's super freaky). Plus, I now have 2,000 amazing followers on IG (which is seriously insane!!!). So, I figured I should make something to celebrate.


I haven't been eating much acai lately, but I had an acai bowl the other day and I was like "Umm...I've been missing OUT!" Additionally, I've gotten on the PB & Acai boat. As weird as it sounds (or at least sounded to me), IT IS BLOODY DELICIOUSSSS! And this Choc-Peanut Butter & Strawberry Nana Ice Cream Slice is probably my favourite recipe on here. So, naturally, I decided to make a PB & Acai Nice Cream Slice. And it definitely did not disappoint.

PB & Acai Nice Cream Slice

for the base: 1 cup oats
1/2 cup shredded coconut
8 (pitted) medjool dates
2 tablespoons coconut nectar

for the acai layer: 1 1/2 frozen bananas
1 cup frozen blueberries
1/4 cup cashews
4 heaped teaspoons acai

for the peanut butter layer: 2 1/2 frozen bananas
4 tablespoons peanut butter
2 tablespoons cashews

Soak the cashews in water for at least 2 hours. Line a pan with baking paper. Put all the ingredients for the base into the food processor (ensuring you have already pitted your dates), and blend it up until combined. If it isn't sticking together properly, add a little bit of water/more dates. Press the base mixture into the bottom of the lined pan, forming a crust.

Wash out your food processor. Toss all the ingredients for the acai layer into it, and blend. If the frozen bananas aren't combining, add a splash of almond milk or even water in a pinch. (If you don't have frozen bananas on hand, that's okay. But be careful when adding the peanut butter layer, it will try to sink beneath the acai layer, and you won't have an even distribution of both layers. Make sure you freeze it long enough that it's semi-solid, or that you spoon and spread the peanut butter layer on top VERY carefully.) Spread the acai layer on top of the base, and place in the freezer to set.

Wash your food processor again (sorry, I know it's annoying). Chuck the ingredients for the peanut butter layer into the food processor, whizz it up. If you didn't use frozen bananas, this is where you either need to make sure you've waited until the first layer has set, or keep waiting for it to set, or take your chances and carefully spoon and smooth the peanut butter layer on top of the acai layer. Otherwise, spread the peanut butter layer on top of the acai layer as recklessly as you please.

Top with your favourite granola (the recipe for my fave is here) and some fruit (I used raspberries). Put the pan in the freezer and enjoy in the morning.

Thursday, November 13, 2014

Raw Carrot Cake


I have achieved Raw Vegan Carrot Cake nirvana (if i do say so myself....tbh, i think i come across a lot more conceited on this blog than i really am. trust me, i really am not a huge fan of myself irl). As I've mentioned previously, nuts and I are not the best of friends. I don't have a real nut allergy. But if I eat too many, I get a really bad headache and just feel bleh. So, although raw vegan desserts may actually be my favourite desserts (i'm actually a little shocked myself, but it's true), I often find myself feeling not so hot after eating them (cause most of them are 245% cashews).

So, lucky for me (and you, if you have similar woes with nuts or are looking to cut calories (because nuts are chock-full of em)) I made this carrot cake with significantly less nuts than any other recipe I've found thus far! Hooray! Less nuts = more happy Sylvia = more nuts Sylvia....so less is more in this case, I suppose. ;)


Now, perhaps you're thinking. "If there are less nuts, will it be less delicious?" No, it will not. I guarantee. And since I come across like a conceited jerk on this blog, I'll provide you with evidence seeing as I am not a trustworthy source (I'm basically Wikipedia....but less reliable, 'cause Wikipedia is actually reliable and schools are stupid not to let students use it as a source and it's probably some kind of conspiracy). My 14-year-old, vegan food-skeptic, carrot cake-hating brother ate MORE of this cake than I did! He kept knocking on the door to my room, and going "Sylvia, can I have a piece of your cake?"


Oh, and P.S. He's also a big time nut-hater. So, if my finnicky little brother likes this cake: I'm considering it a giant win. Also, I laaaahhhhvvveeeddd it. My mom and dad loved it. So, if you aren't finnicky like my little broski, you'll probably like it too. You don't need to be finnicky to love this cake. It's inclusive, babies.

To achieve carrot cake nirvana, you'll need:
for the cake: 2 cups of carrots (apprx. 4 carrots)
1/2 cup walnuts
1 and 1/2 cups oats
1 cup shredded coconut
1 cup sultanas/raisins
12 medjool dates
4 teaspoons cinnamon
2 teaspoons nutmeg
1 teaspoons vanilla

First, let's pit the medjool dates so that we don't break our food processors (or our teeth. i had the worst experience with unknowingly chewing on a date pit at a raw vegan restaurant recently. NOT COOL, man). Now, let's slice up our carrots. And finally, we chuck all the ingredients into the food processor (in however many batches you need. my food processor is itty bitty so i had to do 4 batches) and whizz it up until it forms a dough. If you did it in batches, you may want to mix it all together to ensure there's equal amounts of everything in the different batches. Alright, got the dough/batter/raw stuff all ready? Awesome! Isn't raw vegan "cooking" easy? Now we'll separate the dough stuff in half, and we'll put half in the bottom of a springform tin (cheesecake tin). Okay, stick that in the freezer and let's make the icing.

for the icing: 1/2 cup cashews (preferably soaked for a few hours beforehand)
2 bananas
2 tablespoons lemon juice
1/4 cup coconut oil
1/4 cup water (or a teensy bit less, just go with the flow)
3 tablespoons agave

So, if you soaked the cashews for a bit and you have a decent blender, I recommend making the icing using the blender. In the past, I've had major cashew chunk woes, but this time I used my fab stick blender and I got creamy icing perfection. Otherwise, use a food processor, and just keep going at it until it's smooth, or you don't give an eff anymore. So, throw all the ingredients (sans water) into the food processor or blender (preferably), and add the water as necessary (I used 1/4 cup, but you may want a teensy bit less depending on how thick you want the icing).

Take the springform tin out of the freezer, and spoon about half of the icing on top. Put it back in the freezer for a few hours (until firm), and then layer the rest of the dough/batter stuff on top, and then finish off with another layer of icing. Leave in the fridge overnight/for 4-6 hours. And nom away.

Monday, November 10, 2014

Chili Cheese Cornbread Muffins


Honestly, everything I make on here is about as Southern and American as you can get. Clearly I haven't adapted to Australian cuisine that well (except bircher muesli. bircher muesli is the bomb). Cornbread is something my mom used to make all the time when I was little. We'd normally eat them warm with some butter and honey. Unfortunately, butter has dairy and honey isn't considered vegan. So, I got a little more creative with these muffins. I think they're jazzy enough that they really don't need any added spreads...plus, I'm having trouble thinking of anything that would really mesh that well with "cheese" and chili....but if you have the perfect thing up your sleeve: Do tell!

Chili and cheese are basically my favourite things. So, I'm head over heels with these muffins. Of course, they don't contain real cheese, 'cause DAIRY *runs away and hides under a table in fear*. But they do contain my new favourite thing: SOY CHEESE. Finally, I can have cheese that isn't made out of cashews. YUSSS. Also, imo it tastes waaaay more like cheese than cashew cheese. So, extra bonus. Of course, if you don't eat soy or can't find soy cheese or don't like cheese because you're completely nuts, then you can just omit it, but I might try adding a bit of oil.

For Chili Cheese Cornbread Muffins (makes 9) you'll need:
1/2 cup cornmeal (polenta)
1/2 buckwheat flour
3/4 cup corn kernels (about two small corn cobs worth)
1/3 cup grated soy cheese (optional, but you may want to add a bit of oil if you do choose to omit it)
1 teaspoon hot dried chili flakes
1 teaspoon baking powder
1/2 cup unsweetened almond milk
1 tablespoon flax

Preheat oven to 180 C and oil a muffin tin (or use muffin paper holder things (why can't i ever remember or bother to look up their name?)). Grate your soy cheese, and remove the corn kernels from the cob (by shaving them off with a knife). Combine all ingredients in a bowl. Fill up 9 muffin tins, nearly all the way full. Bake for 15-20 minutes, until a knife or toothpick comes out clean. And enjoy more vegan southern cooking.

Tuesday, November 4, 2014

Body Image

I've talked before about Diabulimia (an eating disorder specific to diabetics in which they limit the amount of insulin they take/stop taking insulin in order to lose weight). What I didn't mention is that, statistically, girls with type 1 diabetes are 2.4 times as likely to develop an eating disorder, as girls without.

That's pretty freaky stuff. I, personally, do not have an eating disorder. In the past, I've suffered from undiagnosed binge eating disorder, but never bulimia, anorexia, or diabulimia. I'm not at all trying to discount having an eating disorder. It's extremely extremely serious, causes permanent damage to your health, and is overall incredibly dangerous. I'm really grateful that I don't have one.

But what I do want to say is that having type 1 diabetes caused me to have an intense over-awareness of my body and a resulting discomfort/shame of my body. Everything revolves around your body once you're diagnosed with type 1 diabetes. Your body is broken. It doesn't work right. You're constantly aware of it. Of every sensation. You constantly search for physical sensations to determine: Is my blood sugar high? Is it low? You worry and worry and worry about it, about your future body. Will I go blind? Will I lose my feet? You can't see your body is broken from the outside. You can cover up the scars, the injection sites. You can hide your insulin pump, or take shots and keep them in your bag. Some people don't even tell their friends they're a diabetic, and it's a pretty easy thing to hide.

I once had a friend refer to me as a model house. "Perfect on the outside, but inside nothing works. There's no running water. No heating." That really stuck with me. It didn't offend me or upset me, but it really meant something to me on a deeper level. I still strongly relate to it today.

In a way, I've found that being a "model house" makes it harder sometimes. You're broken. But no one can see it. People don't think there's really anything wrong with you. They won't know unless you tell them, and when you do they say things like "But you don't look sick." You don't really get free passes. People don't go easier on you. You look normal. You aren't at the hospital every day. Therefore, you're fine. You're perfectly fine.

I applied for special provisions for my HSC exams (the big, fat exams at the end of year 12 that determine your future) so that I could take lollies into the exam and my insulin pump and glucometer. I also got a little bit of extra time in case I had a low blood sugar or needed to leave the room. And oh boy, did the other kids at my school not approve. No one actually said it to my face. But I had multiple close friends come up to me and tell me that other kids I didn't know as well were asking them "Why does SHE get special provisions?!?" Because I looked normal. I was doing pretty well in school. Why on earth should I get special provisions?

But the weird thing about diabetes is that it does cause imperfections on the exterior, but you can hide them. For as long as I can remember, I've been ashamed of the little marks at injection sites, from shots, from insulin pump insertions, from finger pricks. I put my insulin pump in my bum rather than my stomach. The primary reason I keep doing it is that I have more nerve endings in my stomach and it hurts more to put it there. But I started doing it to hide the marks. If I wanted to wear a bikini, or if my shirt lifted up when I stretched, I didn't want people to see the set or see the blemishes it left behind. I used to worry so much about becoming an adult and having these markings all over my body. No one could see them because I was young and covered up, but the thoughts would linger in the deepest corner of my mine. Will anyone want to have an adult relationship with me, to marry me, to see me naked? Will they cringe in disgust?

Later I developed chronic cholecystitis (inflammation of the gallbladder) and acute appendicitis as a side effect of type 1 diabetes. I had to have both organs removed. I have three tiny scars now. One on my right side in between my hip and rib cage. One on my belly button. And one between my ribs. At the time the surgeon actually gave me the option to refuse the gallbladder surgery, and to wait and see if it flared up again. I had been vomiting for 18 hours because I had gone into diabetic ketoacidosis from the gallbladder infection spiking my blood sugar. Not for one second did I consider not having my gallbladder removed right then and there. But I mentally crossed off a few more things I couldn't do in my head. "Can't be a model. Can't wear anything that exposes my stomach." Of course I had never actually entertained the thought of being a model, but just having to cross off another thing I could never do, at such a young age, was excruciatingly painful for me.

Now the scars are little. They're even littler than a birthmark I have on my stomach, and I no longer feel inhibited by them. But I just remember that moment so vividly. I had so much rage. Not only did I have to suffer internally from my illness, but I was now branded by it too.

I've also talked about how diabetes can make you gain weight (because insulin converts energy to fat and excess insulin = excess fat). And boy did I gain weight. And boy is it difficult for me to lose that weight. And I needed to lose it. Not just for me to be happy or to feel pretty or to fit in with what the media or society values or whatever, but I needed to for my health. And yet, my body has resisted me every step of the way.

I don't have a healthy relationship with my body. I don't think I ever will. So many people say "Love your body. It's the only one you've got. It works hard to keep you alive every day. Treat it right." Well, my body isn't keeping my alive. My body is a suicidal, little cuss. It has tried to kill me on numerous occasions. It isn't keeping me alive. I'm keeping me alive. Doctors, and surgeons, and nurses, and phlebotomists, and medical researchers, and Banting & Best are keeping me alive.

So, what do you do then? What do you do with a body that doesn't love you or support you? I think perhaps that's the deepest reason why people with type 1 diabetes are more likely to develop an eating disorder. There are days I just want to slam my body against a wall until it's black and blue to punish it for everything it has done to me. But what is that really going to do? Nothing much. I guess, as a type 1 diabetic or anyone suffering from illness who struggles with body image, you just need to find something else to latch onto. Your family or friends or even yourself. And to treat your jerk of a body right for those reasons. Not for it. Because it is a total ass.

Friday, October 31, 2014

Strawberry Cheesecake Nana Ice Cream


It seems like a lot of my recipes are products of my cravings for unhealthy food. This one goes out to Ben & Jerry's, the masters of (poisonous) delicious ice cream. Shockingly, this healthy, vegan, refined sugar-free recreation could actually give the original Ben & Jerry's flavour a run for its money. 

As a disclaimer: This recipe is pretty adaptable. I made more of some stuff and ate it by itself. If you just want to make one massive batch of ice cream, then go ahead and double the fruits. Add more of this if you like, use less of that. It's really all about what you want. This recipe is more of a framework than a set of unbreakable rules. So do whatcha gotta do.

Also, you have an option to either have some left over cheesecake bites or to double the bananas and strawberries if you don't want any leftovers (but i'll explain that a bit more later)

In order to kick a Ben & Jerry's craving, you'll need:
1 cup of cashews
1 (or 2 if you like it heaps lemony) tablespoons lemon juice
1 tablespoon coconut oil
2 tablespoons agave
4 frozen or fresh bananas (only upside of frozen, is it'll be ready faster) (or 8 bananas, if you don't want extra cheesecake bites)
1/2 cup of frozen or fresh strawberries (or 1 cup if you don't want extra cheesecake bites)
almond milk if using frozen bananas
5-10 fresh strawberries (use your best judgement)

So first you'll want to make your cheesecake bites (since you need it freeze them before you can add them to the ice cream). Chuck the cashews, lemon juice, coconut oil, and agave into your food processor and blend until smooth. Now get a sheet of baking paper and drop little bits of the cheesecake batter onto the sheet (about the size of a dime/aussie 5 cent coin/fingernail). Freeze until solid (about 30min to an hour). 

Cheesecake bites solid? Awesome! So, here's the thing. The cheesecake bites are double the amount you actually need (because anything less won't blend up properly). I was personally pretty pleased with that, because I got to eat the remaining cheesecake bites by themselves as a little snack. Buuuut, if you want them all to be a part of the ice cream double the bananas and strawberries (So, that's 8 bananas, and 1 cup of strawberries). Now blend up the bananas and 1/2 cup (or 1 cup) of strawberries (add a bit of almond milk if using frozen bananas in order to get it to combine properly). Place the ice cream in a tupperware, and start freezing it while you cut up the additional strawberries.

Cut up the extra, fresh strawberries into little chunks and stir them into the ice cream. Add the cheesecake bites and stir it up again. You can either go ahead and eat it right now, if you're happy with the texture. Buuut, you can also freeze it overnight, let it thaw a bit in the morning, and scoop yourself out some "Ben & Jerry's Stawberry Cheesecake" for a more authentic experience.


Sunday, October 26, 2014

Tagalongs


Girl Scout Cookie recreations are baaaaaack! Tagalongs....what can I really say about Tagalongs? Umm...they're delicious. They have peanut butter AND chocolate. So, they're obviously amazing. They're my second favourite Girl Scout Cookie after Samoas. So, it's pretty sad that it's taken this long for me to recreate them, but tbh I was sorta worried they'd be a pain in the butt to make cause peanut butter and chocolate coating are messy enough by themselves. But in the end, it wasn't that bad at all. And even if it was as tragic as I had imagined, IT WOULD HAVE SO BEEN WORTH IT.

So, without further ado I present the ingredient list for yummy vegan, gluten free, refined sugar-free Tagalongs:
for the cookies: 1/4 cup coconut oil
1/4 cup maple syrup or honey
1 tablespoon almond milk
1 cup buckwheat flour
1/4 teaspoon baking powder
pinch of salt
1/2 teaspoon vanilla

Pre-heat the oven to 180 C. Line a tray with baking paper or oil a baking tray. Mix up the wet, add the dry. Flour a surface and, using a rolling pin, roll out the dough. Then cut the cookies into circles (or I guess whatever shape you want, but then they won't look like the real-deal). Bake for 5-10 minutes, until they turn a light golden-brown.

for the peanut butter filling: 1/4 cup smooth peanut butter
1 tablespoon coconut oil
1 tablespoon honey or maple syrup

Mix up the PB, coconut oil, and sweetener of choice until combined. Spread the peanut butter filling on the cookies (preferably after they've had a chance to cool down, otherwise the PB will melt AAALLLL OOOVER your cookies and it'll be messy (but delicious)).

for the chocolate coating: 1/2 cup cocoa/cacao
2 tablespoons coconut oil
4 tablespoons agave
1/4 cup water

Mix all the ingredients together, except for the water. Add the water slowly until it reaches your desired consistency (which will be pretty thin for easy coating). It took me about 1/4 cup, but just be careful. You don't want it to go too liquidy. Dip each cookie into the chocolate coating (peanut butter side up, or else you're gonna have problems, my friend), freeze overnight, devour in the morning.

Friday, October 24, 2014

Pumpkin Pull-Apart Muffins with Choc-Sauce


There were a number of events that influenced the creation of this recipe. 1. I've had a tupperware full of pumpkin puree in my freezer for like two weeks now from back when I made Pumpkin Gnocchi. 2. I saw this incredible-looking pull-apart bread on IG and I thought we were meant to be, but the recipe is chock-full of gluten and dairy and I was like "I'm sorry, my love. But NO." 3. I went to Love Juice and got the most incredible date & banana muffin and developed a serious case of muffin envy. 4. The muffin also pulled apart in little sections, and I was like "OMG ME AND PULL-APART THINGS ARE MFEO." And so, these muffins were born.

(Wow, that was a lot of links....feeling pretty tech-savy atm....even though making a link involves copying a web address and pressing like two buttons and typing in a word or two....but don't judge....)


All the pull-apart breads and muffins I found on the internet had glaze or cream cheese frosting on top and since that was kinda a big no-go for me, I decided to top it with some homemade chocolate sauce, and I really don't feel deprived (at least not in an Oliver Twist or Orphan Annie sorta way). So, I think we can say that was a good call on my part. Also, pumpkin and chocolate is the bomb. I was also a bit worried about them pulling apart, because I didn't use a heap and a half of butter and sugar, but it all worked out beautifully. So, I'm mighty relieved. And yay muffins! 

So in order to make these little pumpkin bits of deliciousness (makes around 6-8) you'll need:
for the muffins: 2 and 1/2 cups buckwheat flour
2/3 cup pumpkin purée
1/4 cup + 2 tablespoons maple syrup
1/4 cup coconut oil
1 teaspoon vanilla 
2 teaspoons baking powder
2 teaspoons cinnamon
1 teaspoon nutmeg
pinch of salt
1 tablespoon flax

Preheat oven to 180 C. Mix together the maple syrup, vanilla, coconut oil, and pumpkin purée, Add the dry ingredients and combine. The dough should be quite thick, if it's too moist to roll out without sticking to everything, add another 1/4 cup of flour. Flour a surface and roll out the dough with a rolling pin. Cut the dough into squares that will fit your muffin tin. Your muffins will comprise of about 5 squares of dough stacked on top of each other. In between each square, spread some melted coconut oil (using a brush or if you're lame like me, you can just dip a spoon in coconut oil and rub the back over the square of dough) and sprinkle some stevia or coconut sugar and cinnamon on top of the oil. Grease your muffin tin or put muffin holders in it. Turn each stack of dough on its side and mold it into a more rounded shape to fit the tin better, and bake for 18-25 minutes.

for the choc sauce: 3 tablespoons cocoa/cacao powder
1/2 tablespoon coconut oil
1 tablespoon agave
2 tablespoons water (or more or less depending on how thick/thin you want your sauce to be)

Mix it all together and drizzle over muffins, and BOOM pull-apart deliciousness.


Tuesday, October 21, 2014

Chocolate Mylkshake with Coconut Whipped Cream


Let's just take a moment to acknowledge the severe lack of smoothie/drink recipes on this blog. It's pretty sparse. There are essentially two reasons for this. 1. I'm not a big smoothie drinker. I like my food either cooked or solid, aside from nana ice cream and acai bowls. 2. I feel like there isn't much I can offer you with a smoothie recipe. It's like "Put in a banana, some strawberries. There you go! Banana and strawberry smoothie!" I'm not enough of a smoothie connoisseur to know all the fancy little spices and extra thingies you add to make them super special and delicious. 

However, eons ago, I made a Banana Popcorn Thickshake which means that there's a Smoothies/Drinks category in my recipe index, and it has ONLY ONE RECIPE. Now, I'm a tad obsessive/OCD and for some reason having only one or two things in a category keeps me up at night (just kidding (jokes, i'm actually serious (haha, no i'm not (okay, maybe a little)))). So, when I made this (DELICIOUS) chocolate mylkshake this morning, I decided I'd better put it up on here to try and bulk up that sad, little Smoothies/Drinks category (and to help me get to sleep tonight).

So, in order to make the Chocolate Mylkshake (and cure my blog-related insomnia) you'll need:
for the mylkshake: 3 frozen bananas
1/2 avocado
1/2 tablespoon almond (or other nut) butter
2 and 1/2 tablespoons cocoa/cacao powder
1 tablespoon agave
2 cups almond milk

Throw all the ingredients into a blender and whizz it all up until smooth and creamy. Separate into two smallish glasses and share, or pour it into one big glass if you're starving.

for the coconut whipped cream: 270 ml can of full-fat coconut milk (I used Ayam premium coconut milk, but basically just make sure you shake whatever can of coconut milk you're gonna buy BEFORE you buy it. You want one that doesn't slosh around very much to at all.)
1/2 tablespoon agave

Leave the coconut milk in the fridge overnight (or for 6ish hours). This allows the stuff in the milk to separate. You should (hopefully) get a plastery type top layer and a liquid bottom layer. Open the can from the bottom and pour out the liquid layer (you aren't gonna use this stuff). Scoop out the hard, plaster junk and put it in a bowl. Whisk it for a bit, add the agave, and keep whisking until it forms soft peaks. It may make a bit extra, store that in the fridge in a tupperware for the next time you need whipped cream (Perhaps on nana ice cream? Or maybe make a bit more whipped cream and make a tart?) Top your mylkshake(s) with the whipped cream, maybe some cacao nibs, maybe even consider getting some fresh berries and dunking them in the shake (it was a really good life decision, guise) and enjoy!

Thursday, October 16, 2014

Maple Granola


This is my go-to granola recipe. I'm not one for experimenting so this was actually a product of not having the right ingredients. I used to use an amazing honey/citrus granola recipe from le pirate, but one day I forgot to buy an orange or honey at the store, and I needed my granola fix. So, I subbed in maple syrup and omitted the orange. My mum (who at the time ate most of the granola, cause I was eating nana ice cream for brekky) actually liked it better with maple syrup. So, I started making it that way. The next time I made it, I was missing pistachios. So, I substituted pepitas (pumpkin seeds). I'm not a huge nut-eater and nor is my mum (we both are slightly allergic). Again, happy coincidence. Then I finally started messing with the oat/chia/quinoa ratios to get them the way I liked. And soon, this recipe replaced the old citrus/honey one. To be honest, this might have been the first time I actually semi-recipe experimented ever....


My mum normally eats this granola with greek yoghurt. I normally eat it on smoothie/acai bowls (or by the handful...hehe....it's insidious....). I also chuck it on top of nana ice cream once in awhile if I'm in a super crunchy mood. Basically, it's good on almost everything.

To make this granola (makes a BIIIIIG batch that will last for at least a week, unless you're a huge granola fiend), you'll need:
2 and 1/2 cups rolled oats
1/2 cup quinoa
1/8 cup chia seeds
1/2 cup chopped almonds
1/2 cup pumpkin seeds (pepitas)
2 teaspoons cinnamon
1 teaspoon nutmeg
1/2 teaspoon ginger
1/4 cup melted coconut oil
1/2 cup maple syrup
dried (chopped) apples (apprx. 7)
dried (chopped) apricots (apprx. 12)
craisins (apprx. 1 big handful)

Pre-heat oven to 200 C. Mix chia, quinoa, oats, pepitas & chopped almonds together. Add the spices and mix again. Add coconut oil & maple syrup and combine. Place a sheet of baking paper on a baking tray, and spread the granola evenly on the tray. Bake for 20-30 min (until it's all slightly browned (or more if you like it a bit burnt), the top layer will be brown before the whole thing is cooked which is where the next step comes in), stirring every 10 minutes. While the granola is baking, chop up[ the apricots and apples. Remove granola from oven. Let cool and mix in dried fruit. Store in a jar and enjoy!

Wednesday, October 15, 2014

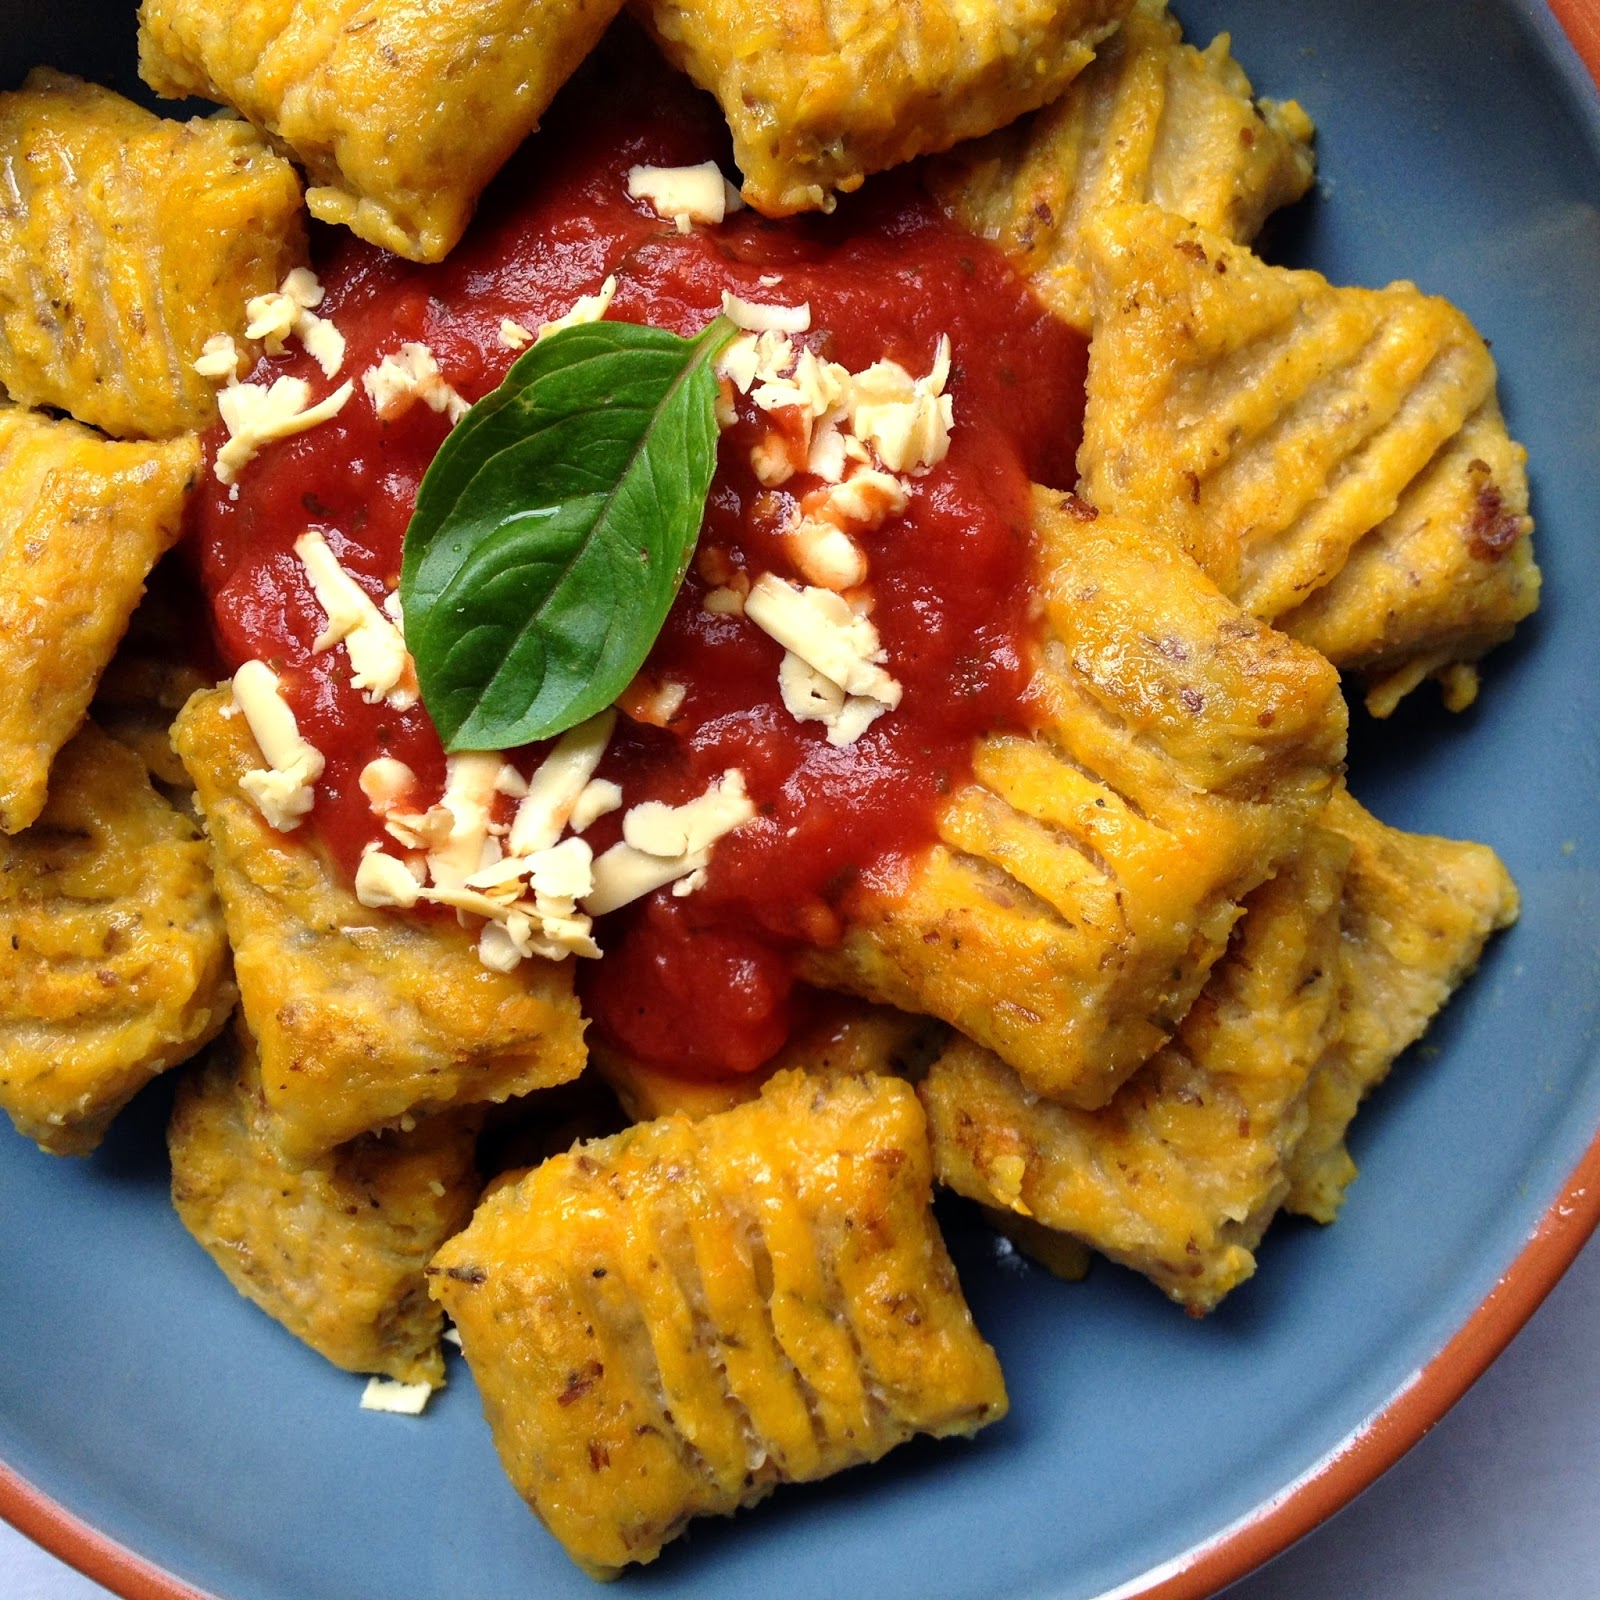
Pumpkin Chickpea Flour Gnocchi


Pasta is legit one of my favourite things. Gnocchi is probs one of my top three pastas. Alas, I hardly ever eat pasta (or gnocchi for that matter) because of my little issue called FLOUR MAKES ME SICK AS A DAWG. However, now that I've discovered all these beautiful little flour substitutes, I can now enjoy pasta again. HOORAY!


So, I used chickpea flour for this and I was really put off by the smell. If you are too, never fear! The pumpkin masks it for the most part, and what it doesn't mask actually complements the pumpkin really well (in my humble opinion).

I guess that's about it. Gluten-free, vegan, PUMPKIN. Pasta without the pain (as I said on IG and probably should not repeat but I am repeating it cuz I'm a loser).

To make painless gnocchi (serves four) you'll need:
1 and 1/3 cups pumpkin puree
3 cups chickpea flour
2 tablespoons thyme
2 tablespoons flax
pinch of salt & pepper

Mix all the ingredients together and set a pot of salted water on the stove top to boil. Flour a surface (eg. countertop) and roll out the dough into a tube (I did this in segments of 6). Slice the tube into pieces and flatten each piece with a fork. Once the water is boiling, toss the gnocchi into the pot (in 3ish batches). Once the gnocchi rise to the top, they're done. Fish them out with a slotted spoon. Oil a skillet and fry the gnocchi at medium-low heat for approximately 30 seconds on each side, until they've slightly browned (again I did this in about 3 batches, but that will depend on the size of your skillet). Take them out of the skillet, top with pasta sauce and soy cheese (OMG IT IS THE ACTUAL BEST THING, NO JOKE), and eat it up!

P.S. I've been eating heaps of homemade soup lately, and you can just chuck little balls of this dough into the water and BOOM pumpkin dumplings in your soup.

Thursday, October 9, 2014

Thin Mints


An Ode to Thin Mints by Sylvia

Oh, Thin Mints. How I despise you, my least favourite Girl Scout Cookie. How I resent your popularity. I will never be able to fathom why you would account for half of my cookies sales when there are so many superior cookies. The disappointment you caused me when cookies sales were over, and I was left with the cookies whose owners I couldn't get in contact with. You were all that was left over. Maybe a box or two of Samoas, an odd Trefoil here or there. But you. There would be countless boxes of you. How I sobbed and sobbed, being forced to eat you. I didn't order any of you for myself, but you were forced upon me by those careless cookie buyers who never retrieved their order. You, Thin Mints, you were the bane of my existence.

Yet in my old age, I have grown soft and sentimental. I couldn't bare to neglect you. Even after all your wrong-doings and your sub-par personality, I had to give you a second chance. To reincarnate you as a healthy, vegan, gluten-free, refined sugar-free version of yourself. And by some luck, in your second life, I didn't hate you. Somehow, I was able to come to peace with you....and I tolerated you. Nay, I liked you. 

Anyways, yepp. I hated HATED HAAAATTTEEDDDD Thin Mints as a Girl Scout. But now, we've sorta made up....or at least, the idea of Thin Mints and I have made up. I'll probably never make up with the nasty, unhealthy ones. But yeah, since most people are Thin Mint lovers from the get-go, you shouldn't need to use this recipe to over-come your deep, dark, haunted relationship with them. But if you're Team Samoa fo' lyfe like me, these guys aren't that bad. They're actually quite good. But if I had to choose between Thin Mints and Samoas or Do-si-dos or Tagalongs, I'm sorry. I would still throw these Thin Mints overboard and let them drown. But legit. They're actually good. I swear. I just love peanutbutter and caramelly-coconut sooooo much more. Probs cause I've never been a huge chocolate person. But if you're a chocolate person or a Thin Mint person. You'd probably run to the rescue of these guys and let my poor Samoas drown. :(

In order to make EVIL (not so evil anymore) Thin Mints, you'll need:
for the cookies: 1 cup buckwheat flour
1/2 cup cocoa powder or cacao powder
pinch of salt
1/2 teaspoon baking powder
1 teaspoon vanilla
1/2 cup agave
2 tablespoons coconut oil
1 tablespoon almond milk

Pre-heat the oven to 180 C. Line a baking tray with baking paper, or oil it up. Mix all the ingredients together. Flour a surface (eg. counter-top) and roll out the cookie dough, using a rolling pin. Use a cookie-cutter (or in my case, a mason jar) to cut the cookies into circles. Put them on the baking tray. Put them in the oven, and bake for 4-10 minutes.

for the chocolate-mint coating: 1/2 cup cocoa/cacao
2 tablespoons coconut oil
4 tablespoons agave
6 drops peppermint oil (or 1 teaspoon peppermint extract)
1/4 cup water

Mix all the ingredients together, except for the water. Add the water slowly until it reaches your desired consistency (which will be pretty thin for easy coating). I found it took me 1/4 cup, but just be careful with it. You don't want it to go too liquidy. Dip each cookie into the chocolate-mint coating and freeze overnight.