Friday, October 31, 2014

Strawberry Cheesecake Nana Ice Cream


It seems like a lot of my recipes are products of my cravings for unhealthy food. This one goes out to Ben & Jerry's, the masters of (poisonous) delicious ice cream. Shockingly, this healthy, vegan, refined sugar-free recreation could actually give the original Ben & Jerry's flavour a run for its money. 

As a disclaimer: This recipe is pretty adaptable. I made more of some stuff and ate it by itself. If you just want to make one massive batch of ice cream, then go ahead and double the fruits. Add more of this if you like, use less of that. It's really all about what you want. This recipe is more of a framework than a set of unbreakable rules. So do whatcha gotta do.

Also, you have an option to either have some left over cheesecake bites or to double the bananas and strawberries if you don't want any leftovers (but i'll explain that a bit more later)

In order to kick a Ben & Jerry's craving, you'll need:
1 cup of cashews
1 (or 2 if you like it heaps lemony) tablespoons lemon juice
1 tablespoon coconut oil
2 tablespoons agave
4 frozen or fresh bananas (only upside of frozen, is it'll be ready faster) (or 8 bananas, if you don't want extra cheesecake bites)
1/2 cup of frozen or fresh strawberries (or 1 cup if you don't want extra cheesecake bites)
almond milk if using frozen bananas
5-10 fresh strawberries (use your best judgement)

So first you'll want to make your cheesecake bites (since you need it freeze them before you can add them to the ice cream). Chuck the cashews, lemon juice, coconut oil, and agave into your food processor and blend until smooth. Now get a sheet of baking paper and drop little bits of the cheesecake batter onto the sheet (about the size of a dime/aussie 5 cent coin/fingernail). Freeze until solid (about 30min to an hour). 

Cheesecake bites solid? Awesome! So, here's the thing. The cheesecake bites are double the amount you actually need (because anything less won't blend up properly). I was personally pretty pleased with that, because I got to eat the remaining cheesecake bites by themselves as a little snack. Buuuut, if you want them all to be a part of the ice cream double the bananas and strawberries (So, that's 8 bananas, and 1 cup of strawberries). Now blend up the bananas and 1/2 cup (or 1 cup) of strawberries (add a bit of almond milk if using frozen bananas in order to get it to combine properly). Place the ice cream in a tupperware, and start freezing it while you cut up the additional strawberries.

Cut up the extra, fresh strawberries into little chunks and stir them into the ice cream. Add the cheesecake bites and stir it up again. You can either go ahead and eat it right now, if you're happy with the texture. Buuut, you can also freeze it overnight, let it thaw a bit in the morning, and scoop yourself out some "Ben & Jerry's Stawberry Cheesecake" for a more authentic experience.


Sunday, October 26, 2014

Tagalongs


Girl Scout Cookie recreations are baaaaaack! Tagalongs....what can I really say about Tagalongs? Umm...they're delicious. They have peanut butter AND chocolate. So, they're obviously amazing. They're my second favourite Girl Scout Cookie after Samoas. So, it's pretty sad that it's taken this long for me to recreate them, but tbh I was sorta worried they'd be a pain in the butt to make cause peanut butter and chocolate coating are messy enough by themselves. But in the end, it wasn't that bad at all. And even if it was as tragic as I had imagined, IT WOULD HAVE SO BEEN WORTH IT.

So, without further ado I present the ingredient list for yummy vegan, gluten free, refined sugar-free Tagalongs:
for the cookies: 1/4 cup coconut oil
1/4 cup maple syrup or honey
1 tablespoon almond milk
1 cup buckwheat flour
1/4 teaspoon baking powder
pinch of salt
1/2 teaspoon vanilla

Pre-heat the oven to 180 C. Line a tray with baking paper or oil a baking tray. Mix up the wet, add the dry. Flour a surface and, using a rolling pin, roll out the dough. Then cut the cookies into circles (or I guess whatever shape you want, but then they won't look like the real-deal). Bake for 5-10 minutes, until they turn a light golden-brown.

for the peanut butter filling: 1/4 cup smooth peanut butter
1 tablespoon coconut oil
1 tablespoon honey or maple syrup

Mix up the PB, coconut oil, and sweetener of choice until combined. Spread the peanut butter filling on the cookies (preferably after they've had a chance to cool down, otherwise the PB will melt AAALLLL OOOVER your cookies and it'll be messy (but delicious)).

for the chocolate coating: 1/2 cup cocoa/cacao
2 tablespoons coconut oil
4 tablespoons agave
1/4 cup water

Mix all the ingredients together, except for the water. Add the water slowly until it reaches your desired consistency (which will be pretty thin for easy coating). It took me about 1/4 cup, but just be careful. You don't want it to go too liquidy. Dip each cookie into the chocolate coating (peanut butter side up, or else you're gonna have problems, my friend), freeze overnight, devour in the morning.

Friday, October 24, 2014

Pumpkin Pull-Apart Muffins with Choc-Sauce


There were a number of events that influenced the creation of this recipe. 1. I've had a tupperware full of pumpkin puree in my freezer for like two weeks now from back when I made Pumpkin Gnocchi. 2. I saw this incredible-looking pull-apart bread on IG and I thought we were meant to be, but the recipe is chock-full of gluten and dairy and I was like "I'm sorry, my love. But NO." 3. I went to Love Juice and got the most incredible date & banana muffin and developed a serious case of muffin envy. 4. The muffin also pulled apart in little sections, and I was like "OMG ME AND PULL-APART THINGS ARE MFEO." And so, these muffins were born.

(Wow, that was a lot of links....feeling pretty tech-savy atm....even though making a link involves copying a web address and pressing like two buttons and typing in a word or two....but don't judge....)


All the pull-apart breads and muffins I found on the internet had glaze or cream cheese frosting on top and since that was kinda a big no-go for me, I decided to top it with some homemade chocolate sauce, and I really don't feel deprived (at least not in an Oliver Twist or Orphan Annie sorta way). So, I think we can say that was a good call on my part. Also, pumpkin and chocolate is the bomb. I was also a bit worried about them pulling apart, because I didn't use a heap and a half of butter and sugar, but it all worked out beautifully. So, I'm mighty relieved. And yay muffins! 

So in order to make these little pumpkin bits of deliciousness (makes around 6-8) you'll need:
for the muffins: 2 and 1/2 cups buckwheat flour
2/3 cup pumpkin purée
1/4 cup + 2 tablespoons maple syrup
1/4 cup coconut oil
1 teaspoon vanilla 
2 teaspoons baking powder
2 teaspoons cinnamon
1 teaspoon nutmeg
pinch of salt
1 tablespoon flax

Preheat oven to 180 C. Mix together the maple syrup, vanilla, coconut oil, and pumpkin purée, Add the dry ingredients and combine. The dough should be quite thick, if it's too moist to roll out without sticking to everything, add another 1/4 cup of flour. Flour a surface and roll out the dough with a rolling pin. Cut the dough into squares that will fit your muffin tin. Your muffins will comprise of about 5 squares of dough stacked on top of each other. In between each square, spread some melted coconut oil (using a brush or if you're lame like me, you can just dip a spoon in coconut oil and rub the back over the square of dough) and sprinkle some stevia or coconut sugar and cinnamon on top of the oil. Grease your muffin tin or put muffin holders in it. Turn each stack of dough on its side and mold it into a more rounded shape to fit the tin better, and bake for 18-25 minutes.

for the choc sauce: 3 tablespoons cocoa/cacao powder
1/2 tablespoon coconut oil
1 tablespoon agave
2 tablespoons water (or more or less depending on how thick/thin you want your sauce to be)

Mix it all together and drizzle over muffins, and BOOM pull-apart deliciousness.


Tuesday, October 21, 2014

Chocolate Mylkshake with Coconut Whipped Cream


Let's just take a moment to acknowledge the severe lack of smoothie/drink recipes on this blog. It's pretty sparse. There are essentially two reasons for this. 1. I'm not a big smoothie drinker. I like my food either cooked or solid, aside from nana ice cream and acai bowls. 2. I feel like there isn't much I can offer you with a smoothie recipe. It's like "Put in a banana, some strawberries. There you go! Banana and strawberry smoothie!" I'm not enough of a smoothie connoisseur to know all the fancy little spices and extra thingies you add to make them super special and delicious. 

However, eons ago, I made a Banana Popcorn Thickshake which means that there's a Smoothies/Drinks category in my recipe index, and it has ONLY ONE RECIPE. Now, I'm a tad obsessive/OCD and for some reason having only one or two things in a category keeps me up at night (just kidding (jokes, i'm actually serious (haha, no i'm not (okay, maybe a little)))). So, when I made this (DELICIOUS) chocolate mylkshake this morning, I decided I'd better put it up on here to try and bulk up that sad, little Smoothies/Drinks category (and to help me get to sleep tonight).

So, in order to make the Chocolate Mylkshake (and cure my blog-related insomnia) you'll need:
for the mylkshake: 3 frozen bananas
1/2 avocado
1/2 tablespoon almond (or other nut) butter
2 and 1/2 tablespoons cocoa/cacao powder
1 tablespoon agave
2 cups almond milk

Throw all the ingredients into a blender and whizz it all up until smooth and creamy. Separate into two smallish glasses and share, or pour it into one big glass if you're starving.

for the coconut whipped cream: 270 ml can of full-fat coconut milk (I used Ayam premium coconut milk, but basically just make sure you shake whatever can of coconut milk you're gonna buy BEFORE you buy it. You want one that doesn't slosh around very much to at all.)
1/2 tablespoon agave

Leave the coconut milk in the fridge overnight (or for 6ish hours). This allows the stuff in the milk to separate. You should (hopefully) get a plastery type top layer and a liquid bottom layer. Open the can from the bottom and pour out the liquid layer (you aren't gonna use this stuff). Scoop out the hard, plaster junk and put it in a bowl. Whisk it for a bit, add the agave, and keep whisking until it forms soft peaks. It may make a bit extra, store that in the fridge in a tupperware for the next time you need whipped cream (Perhaps on nana ice cream? Or maybe make a bit more whipped cream and make a tart?) Top your mylkshake(s) with the whipped cream, maybe some cacao nibs, maybe even consider getting some fresh berries and dunking them in the shake (it was a really good life decision, guise) and enjoy!

Thursday, October 16, 2014

Maple Granola


This is my go-to granola recipe. I'm not one for experimenting so this was actually a product of not having the right ingredients. I used to use an amazing honey/citrus granola recipe from le pirate, but one day I forgot to buy an orange or honey at the store, and I needed my granola fix. So, I subbed in maple syrup and omitted the orange. My mum (who at the time ate most of the granola, cause I was eating nana ice cream for brekky) actually liked it better with maple syrup. So, I started making it that way. The next time I made it, I was missing pistachios. So, I substituted pepitas (pumpkin seeds). I'm not a huge nut-eater and nor is my mum (we both are slightly allergic). Again, happy coincidence. Then I finally started messing with the oat/chia/quinoa ratios to get them the way I liked. And soon, this recipe replaced the old citrus/honey one. To be honest, this might have been the first time I actually semi-recipe experimented ever....


My mum normally eats this granola with greek yoghurt. I normally eat it on smoothie/acai bowls (or by the handful...hehe....it's insidious....). I also chuck it on top of nana ice cream once in awhile if I'm in a super crunchy mood. Basically, it's good on almost everything.

To make this granola (makes a BIIIIIG batch that will last for at least a week, unless you're a huge granola fiend), you'll need:
2 and 1/2 cups rolled oats
1/2 cup quinoa
1/8 cup chia seeds
1/2 cup chopped almonds
1/2 cup pumpkin seeds (pepitas)
2 teaspoons cinnamon
1 teaspoon nutmeg
1/2 teaspoon ginger
1/4 cup melted coconut oil
1/2 cup maple syrup
dried (chopped) apples (apprx. 7)
dried (chopped) apricots (apprx. 12)
craisins (apprx. 1 big handful)

Pre-heat oven to 200 C. Mix chia, quinoa, oats, pepitas & chopped almonds together. Add the spices and mix again. Add coconut oil & maple syrup and combine. Place a sheet of baking paper on a baking tray, and spread the granola evenly on the tray. Bake for 20-30 min (until it's all slightly browned (or more if you like it a bit burnt), the top layer will be brown before the whole thing is cooked which is where the next step comes in), stirring every 10 minutes. While the granola is baking, chop up[ the apricots and apples. Remove granola from oven. Let cool and mix in dried fruit. Store in a jar and enjoy!

Wednesday, October 15, 2014

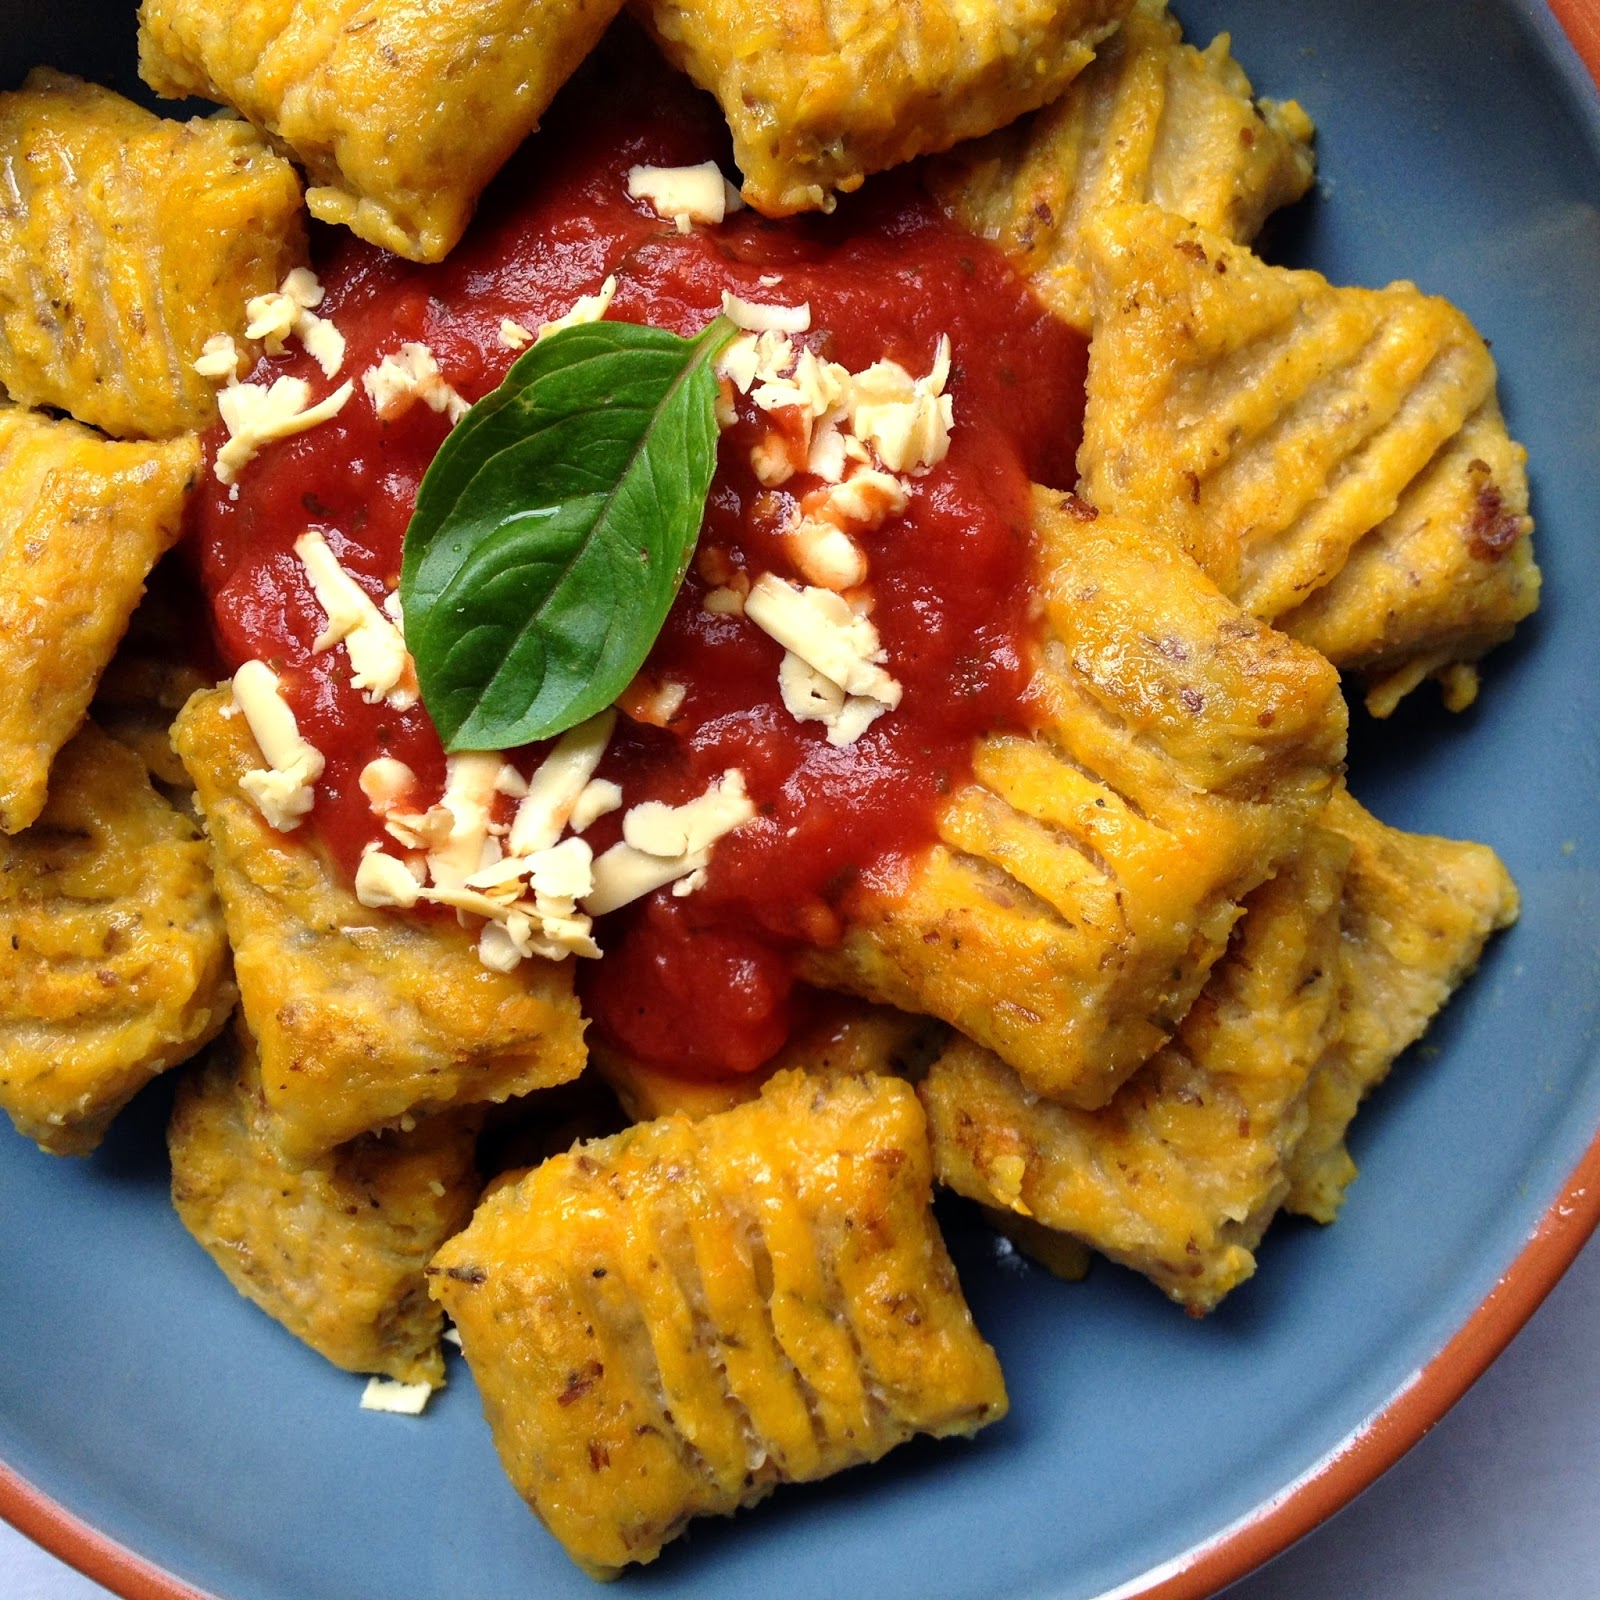
Pumpkin Chickpea Flour Gnocchi


Pasta is legit one of my favourite things. Gnocchi is probs one of my top three pastas. Alas, I hardly ever eat pasta (or gnocchi for that matter) because of my little issue called FLOUR MAKES ME SICK AS A DAWG. However, now that I've discovered all these beautiful little flour substitutes, I can now enjoy pasta again. HOORAY!


So, I used chickpea flour for this and I was really put off by the smell. If you are too, never fear! The pumpkin masks it for the most part, and what it doesn't mask actually complements the pumpkin really well (in my humble opinion).

I guess that's about it. Gluten-free, vegan, PUMPKIN. Pasta without the pain (as I said on IG and probably should not repeat but I am repeating it cuz I'm a loser).

To make painless gnocchi (serves four) you'll need:
1 and 1/3 cups pumpkin puree
3 cups chickpea flour
2 tablespoons thyme
2 tablespoons flax
pinch of salt & pepper

Mix all the ingredients together and set a pot of salted water on the stove top to boil. Flour a surface (eg. countertop) and roll out the dough into a tube (I did this in segments of 6). Slice the tube into pieces and flatten each piece with a fork. Once the water is boiling, toss the gnocchi into the pot (in 3ish batches). Once the gnocchi rise to the top, they're done. Fish them out with a slotted spoon. Oil a skillet and fry the gnocchi at medium-low heat for approximately 30 seconds on each side, until they've slightly browned (again I did this in about 3 batches, but that will depend on the size of your skillet). Take them out of the skillet, top with pasta sauce and soy cheese (OMG IT IS THE ACTUAL BEST THING, NO JOKE), and eat it up!

P.S. I've been eating heaps of homemade soup lately, and you can just chuck little balls of this dough into the water and BOOM pumpkin dumplings in your soup.

Thursday, October 9, 2014

Thin Mints


An Ode to Thin Mints by Sylvia

Oh, Thin Mints. How I despise you, my least favourite Girl Scout Cookie. How I resent your popularity. I will never be able to fathom why you would account for half of my cookies sales when there are so many superior cookies. The disappointment you caused me when cookies sales were over, and I was left with the cookies whose owners I couldn't get in contact with. You were all that was left over. Maybe a box or two of Samoas, an odd Trefoil here or there. But you. There would be countless boxes of you. How I sobbed and sobbed, being forced to eat you. I didn't order any of you for myself, but you were forced upon me by those careless cookie buyers who never retrieved their order. You, Thin Mints, you were the bane of my existence.

Yet in my old age, I have grown soft and sentimental. I couldn't bare to neglect you. Even after all your wrong-doings and your sub-par personality, I had to give you a second chance. To reincarnate you as a healthy, vegan, gluten-free, refined sugar-free version of yourself. And by some luck, in your second life, I didn't hate you. Somehow, I was able to come to peace with you....and I tolerated you. Nay, I liked you. 

Anyways, yepp. I hated HATED HAAAATTTEEDDDD Thin Mints as a Girl Scout. But now, we've sorta made up....or at least, the idea of Thin Mints and I have made up. I'll probably never make up with the nasty, unhealthy ones. But yeah, since most people are Thin Mint lovers from the get-go, you shouldn't need to use this recipe to over-come your deep, dark, haunted relationship with them. But if you're Team Samoa fo' lyfe like me, these guys aren't that bad. They're actually quite good. But if I had to choose between Thin Mints and Samoas or Do-si-dos or Tagalongs, I'm sorry. I would still throw these Thin Mints overboard and let them drown. But legit. They're actually good. I swear. I just love peanutbutter and caramelly-coconut sooooo much more. Probs cause I've never been a huge chocolate person. But if you're a chocolate person or a Thin Mint person. You'd probably run to the rescue of these guys and let my poor Samoas drown. :(

In order to make EVIL (not so evil anymore) Thin Mints, you'll need:
for the cookies: 1 cup buckwheat flour
1/2 cup cocoa powder or cacao powder
pinch of salt
1/2 teaspoon baking powder
1 teaspoon vanilla
1/2 cup agave
2 tablespoons coconut oil
1 tablespoon almond milk

Pre-heat the oven to 180 C. Line a baking tray with baking paper, or oil it up. Mix all the ingredients together. Flour a surface (eg. counter-top) and roll out the cookie dough, using a rolling pin. Use a cookie-cutter (or in my case, a mason jar) to cut the cookies into circles. Put them on the baking tray. Put them in the oven, and bake for 4-10 minutes.

for the chocolate-mint coating: 1/2 cup cocoa/cacao
2 tablespoons coconut oil
4 tablespoons agave
6 drops peppermint oil (or 1 teaspoon peppermint extract)
1/4 cup water

Mix all the ingredients together, except for the water. Add the water slowly until it reaches your desired consistency (which will be pretty thin for easy coating). I found it took me 1/4 cup, but just be careful with it. You don't want it to go too liquidy. Dip each cookie into the chocolate-mint coating and freeze overnight. 


Tuesday, October 7, 2014

Do-si-dos


Okay, I couldn't stop at Samoas. I had to make Do-si-dos. I was having a major baking/peanut butter craving in the middle of the night and I couldn't resist the temptation to make these. Admittedly, Tagalongs are my favourite Girl Scout Cookies after Samoas, but I wasn't in the mood to deal with dipping things in chocolate and freezing them and blaahhhh. So, Do-si-dos it was!


I wanted to have a major meltdown because they didn't come out looking like packaged Do-si-dos. They're pretty obviously homemade. But they did taste just like the real deal (but healthier!). This time around they aren't gluten-free (soz). Because I love oats. Oats oats oats. And I was not about to sacrifice oatmeal cookies for the sake of being gluten-free. But you could play around and replace the oats with more buckwheat flour for 100% gluten-free. Like last time, though, they're vegan and refined sugar-free! Yippee!

You'll need:
for the cookies: 3/4 cup buckwheat flour
1/2 cup oats 
1 teaspoon baking powder
2 tablespoons flax
pinch of salt
1 teaspoon vanilla
1/3 cup crunchy peanut butter
1/3 cup honey
3 tablespoons coconut oil

Pre-heat the oven to 180 C and line a baking tray with baking paper or oil it. Mix up the dry ingredients. Add the wet ingredients and mix again. Roll the dough into tiny balls in your hands and flatten them out on the baking tray. Bake for 4-10 minutes, until the tops have slightly browned.

for the filling: 1/4 cup smooth peanut butter
1 tablespoon coconut oil
1 tablespoon honey

Mix up the ingredients together until combined (or whip them for a fluffier texture). Spread between two of the cookies. And there you have it, sports fans (or baking fans?)! Homemade Do-si-dos!


Avocado & Lime Bread

Adapted from this recipe

The above photo was posted on Mayver's Food's instagram this afternoon which was completely INSANE. I am a huuuuuge lover of Mayver's nut butters and I have used them in countless recipes. Their Peanut Coconut spread isn't technically in this recipe, but it was a perfect topping. 

Now some of you might be thinking, "Avocado and lime bread? Why? Ew. Just why?" Well, the why is because I got this bag of avocados for 5 dollars and I decided to have fun while desperately trying to use them all up before they rotted. Now as for the "Ew," it's actually really good. Weird as it may sound. It's sort of like banana bread's feisty cousin. Really moist from the avocados and sweetened by maple syrup. Really really delicious.

You'll need:
1 and 1/2 avocado (but I had teeny avocados so I used 2)
juice of a lime
3/4 cup maple syrup
1 tablespoon flax
1 and 1/4 cups wholewheat flour
1 and 1/2 teaspoons baking powder
pinch of salt
pumpkin seeds (aka pepitas) to top

Pre-heat the oven to 180 C. Line a loaf pan with baking paper or grease the pan and sprinkle some flour on the bottom and edges of the pan. Mash up the avocado with the lime juice. Combine with maple syrup. Add the dry ingredients and mix it all together. Now, where you put the pumpkin seeds depends on what side of the bread you want to be the top. Since I used a pan with a design, I wanted the bottom of the bread to be the top (if that makes sense?). So, I sprinkled pumpkin seeds in the bottom of my pan and poured the bread mixture over it. If you wanted the top to be the top, then you'd pour the bread mix in and top with pumpkin seeds. Bake for 20-35 minutes, until a knife or toothpick comes out clean. Let it cool. Slice it. And for the optimal experience: top with Mayver's Peanut & Coconut spread. Otherwise, eat it plain or top with a different nut butter.